Wednesday, May 27, 2015

How to Write a Topic Sentence

When writing a topic sentence, I say that every topic sentence needs a TOPIC and A MAIN POINT. Here's what I mean, students are writing about something but they also need to make a clear and focused point about that something. Here is what I mean....

 how to write a topic sentence

Your topic is watching TV and the point you are making in this paragraph is that violence negatively influences behavior. 

When students are just beginning to write a topic sentence, it might be ok for them to write "watching too much TV is harmful." But, as they become better writers, if students just wrote "watching too much TV is harmful," it really doesn't provide the reader with enough information about the paragraph. What about watching too much TV is harmful? What else is the writer going to write about harmful TV watching?  

Teaching students the TOPIC + MAIN POINT technique helps students make sure their topic sentence is specific and focused, which allows them to further expand on the topic in an effective way. 

Some activity suggestions: 
Two activities I have liked to do to help them understand topic sentences are using sentence stripes and writing topic sentences for already written paragraphs. You could easily write a paragraph with a good quality topic sentence, mix up the sentences, and have the students put them paragraph back in order identifying the topic sentence and other parts of the paragraph if you want. The other activity I like to do is to pre-write some paragraphs that are missing a topic sentence. The students should then write a topic sentence that goes with that paragraph. Then, have the students share their topic sentences and they will see that while not everyone's is the exact same, they are fairly similar. 

If you would like to download the activities suggested above please CLICK HERE. I also have a whole group PowerPoint lesson available to you. 

Friday, May 1, 2015

Classroom Management Tips and Tricks: Using the Restroom

Classroom Management Tips and Tricks: Using the Restroom

Managing who uses the restroom and when is such a small part of the day, but it can be frustrating. Of course someone ALWAYS needs to go right when you start an important lesson or when you begin seat work, a writing task, or worse, in the middle of you giving directions. This tip works for literally any classroom no matter what age K-8.

How it works:

Have a designated object, one for boys and one for girls, that indicates they are in the restroom. When a student needs to use the bathroom, they just get up grab the object, and set it on their desk and go to the bathroom. When they come back, they return it to its designated spot. Simple!

Having been a substitute teacher, I have seen many different things used as the "restroom indicator" from beanie babies and passes that say BOYS or GIRLS. However, my favorite was simply small cones such as pictured below. Why? They are very easy to spot on a students desk when you are scanning the room and don't break easily.


Why it works:

I love this because the students have to make a decision about if it is or is not a good time to leave the room. It helps them become slightly more independent and take ownership over their learning. If they choose to leave the room in the middle of an important lesson or it results in them not finishing their work, they have to make up for it.
In addition....
1. Only 1 boy and 1 girl can be out of the room at the time. If there is no cone/bathroom indicator available, they just have to wait without even asking you :)
2. They don't have to interrupt your lesson or other students work time to ask you to use the bathroom
3. If they get up to go to the bathroom and it's not a good time, you can just let them know without a discussion about it. A simple "not now" or "in five minutes" does the trick.
4. If you are super busy and you can't remember who left to use the bathroom 5 minutes ago, just glance around the room and find their desk. Let's face it, those students and those days happen.

For the student that takes advantage:

I know what you might be thinking, what about the student who decides this is a free pass to leave your classroom 10 times a day. Not to worry. I have a solution for that. Popsicle sticks! Assign 2-3 popsicle sticks to that particular student or to the whole class. When they want to use the restroom, they have to turn in the stick. If by the end of the day they run out of sticks, oh well (unless it's a huge emergency)!!

Visit my TeachersPayTeachers store by clocking here!

Wednesday, March 4, 2015

Substitute Teacher Report

I love leaving this form when I am visiting classrooms! Sometimes teachers want something specific filled out so I leave notes that way. Sometimes there is nothing at all so I bring my own copy of this form.  It takes 2 minutes to fill out at the end of a day. 

I can't take all the credit for designing this because I saw similar ideas on Pinterest, but I made it my own! 


Becky's Room on TPT

Friday, February 27, 2015

Writing an Introduction Strategies

Introductions are so important because it's the first impression the reader gets about your essay, it provides a road map for the rest of your essay, it makes readers want to keep reading your essay, and it provides the writers opinion.

An introduction needs to have 3 things.

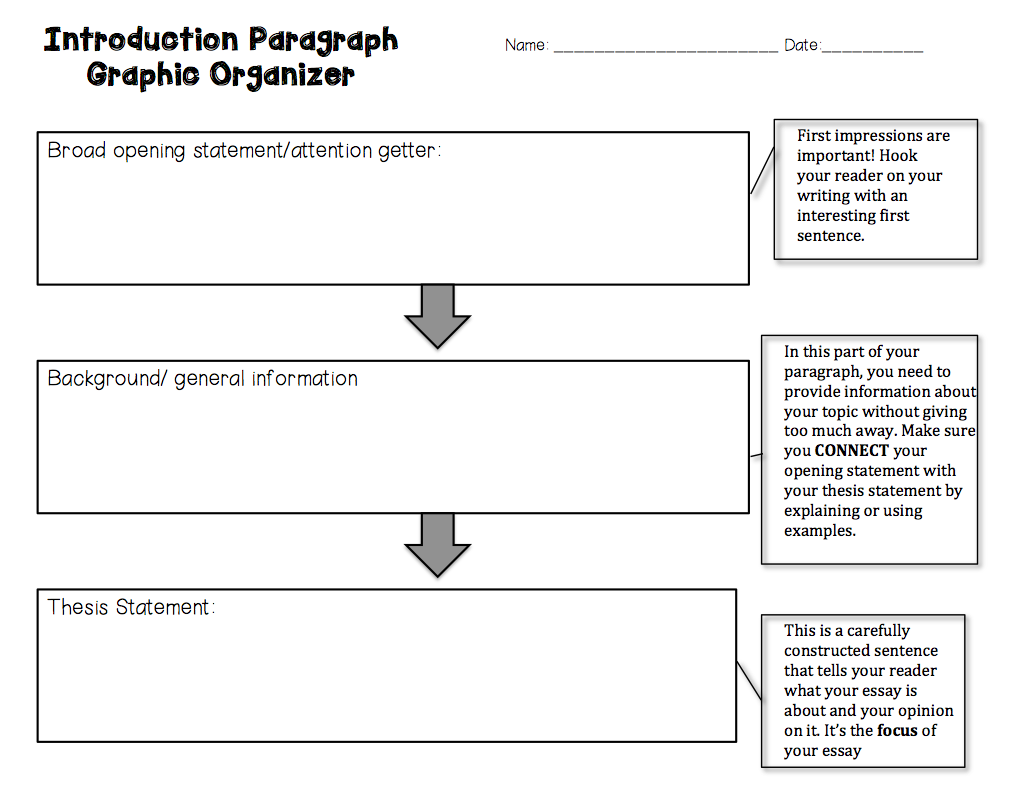
1. Something to get the readers attention or get them interested
2. Necessary background information
3. The thesis statement


This graphic organizer is something I created to help beginning writers write an introduction. 


Some strategies for writing the introduction are as follows:

1. Begin with a shocking statement. - Use some facts from a text that goes along with your essay or make a bold statement about the topic of your essay. This grabs the readers attention and makes them want to keep reading.

2. Ask a question- Ask a question and have your whole essay be a response to the question you posed. Be careful though. This is an "easy" way for students to start their essays and very often they get stuck using the questioning technique.

3. Begin with a personal anecdote - Make a connection to your essay! Refer to something that happened to you. This can be a VERY powerful way to start an essay because it makes the reader want to see how your experience unfolds throughout your essay.

4. Give historical background to set the scene- Depending on the topic of your essay, you might want to provide some background information to set the reader up to successfully understand your writing.

5. Use a quote from someone who is knowledgeable on the subject. Don't forget to give the author credit for their quote :)

6. Begin with a sensory description of the setting- Set the scene using descriptive words that pull the reader in.


If you would like to see a full PowerPoint Lesson with graphic organizers on how to write an introduction, thesis, and conclusion, click HERE.

Friday, February 20, 2015

Introductory Paragraph Graphic Organizer

Writing an introductory paragraph for young writers takes practice.

I have found that around 4th grade they get taught about "hooking" their reader in. An easy way for them to do that is to start with a question. So by 5th grade... all of them are starting their papers with questions! Now, there isn't anything extremely wrong about this in middle school, but it can get boring for the reader (aka ME). Sometimes I would like to shout, "There are other options out there people!" This means a huge part of my time is teaching the students other ways to start their essays.

To start teaching them how to write an introduction, I use this graphic organizer which I made. There are three sections

1. The broad opening statement/attention getter (*Note I didn't use the word HOOK since it is so strongly associated with asking a question for some reason)  
2. Background or general information 
3. The thesis 
 Introduction with thesis statement graphic organizer


To use this template, I start by modeling. I love modeling and I love my writing journal, so I model everything in a writing journal just like the ones the students have.

The writing prompt I use is usually one that I just made up that morning and it is usually from a novel we are reading. This way it is relevant to our reading curriculum too. So I model how to write an introduction from the prompt with a little help from the class. As I am doing this, the students are also copying what I am doing down on their own organizer which is cut and pasted into their journals for future reference. It becomes their own personal writing textbook.

The next day, I will have another writing prompt that is once again usually something I made up that morning and is usually from the novel we are reading. But this time, they will be the ones telling me what to write in the graphic organizer. Everyone has out yesterdays introduction to look at and I take lots of students comments and ideas and as a class we decide on what goes into that paragraph.

Depending on how quickly and how well they are catching on, on the third day I will have them do it on their own with a partner or go straight to trying it on their own. Days 4 and 5 are on their own practice. By the 5th, we also might be switching our introductions with a peer for editing.

One final thing I should mention is that I didn't give a specific number of sentences that the students should use. I will leave that up to you! As a general rule, we go with the five sentences minimum per paragraph. But with an introduction, some turn out very repetitive because they are trying to squeeze in an extra sentence whereas others need to make theirs longer.

If you would like a copy of my graphic organizer click HERE. This link also contains a graphic organizer for how to write a thesis statement.

Enjoy!

Friday, February 13, 2015

Understanding the number 5- Number Sense


FREEBIE FRIDAY ALERT!! 

Here's a fun little whole group lesson you can do with pre-school age- kindergarten. This is also great for those looking to work on numbers at home. 

Before trying the lesson, make sure they can count to 5. After they can count to five, you want them to understand what FIVE really means. 

During this lesson, you will have the kids fill in the bubbles ONE section at a time, all adding up to five, using two different colored markers, crayons, or highlighters. For example, “Show me 1 + 4”. One circle is green and 4 are red. How many do you have?  Then they practice writing the numbers in the equation. You should also phrase your question differently. For example, say, “If I have 1 circle red, how many more circle will I need to fill in to get 5?”


So what does this do? MATH FACTS and NUMBER SENSE!!!! 

It helps students start learning their math facts! That is such an important foundation for all math. 

Number sense- or the intuitive understanding of numbers and their relationships. Number sense is the ability to have a sense of what numbers mean. That means the the number 5 means five objects. This little activity helps to create a visual pattern for the visual learners. It also helps kids compare sets of numbers in a manageable way. 

And for those of you tackling Common Core State Standards.... this is a great little activity for "conceptual understanding of numbers."

Click HERE to download a free PDF file of my understanding the number 5 lesson

Here's a link to a number sense game for kids

Friday, February 6, 2015

Friday Freebie!

I LOVE graphic organizers.

Here is a story map graphic organizer I made. You could also use it if you are working on parts of a story or literary elements

Click here to download the organizer like the one below for free!