Monday, December 21, 2015

Writers Notebook: Paragraph Structure

Want a yummy way to teach your students the proper structure for a paragraph? I brought in a pack of Oreos to accompany this lesson.


After we went over the parts of the Oreo paragraph, we read the paragraph and used our highlighters to identify the parts of the paragraph. 

I LOVED doing this because all year we just had to say "Oreo" and they knew exactly what they needed to do to fix their writing! 

Apparently I have a thing for using food to teach... hey it's effective! Click HERE for a free powerpoint lesson on paragraph structure using a hamburger! 

Wednesday, December 16, 2015

Writers Notebook: Evidence From the Text Using Direct Quotes

Evidence From the Text:

Using the author's words to support a students words requires some skill at first but ultimately it makes for a very strong writer. It is also a common core standard so that makes it kind of important too ha!

The point I like to drive home it that what you have to say is really good. BUT when what you say is supported by what the author says (a credible source) it makes your writing/argument/topic much stronger!


Here are the two biggest problems I noticed when introducing using evidence from the text with direct quotes & how I fixed them. 

1. The quotes made no sense 
I think some students get a little overwhelmed with having to not only write an essay but also pick out and cite quotes.

Evidence from the text has to make sense to the students writing so picking quality quotes is more important to me than the quantity of quotes. 

How I fixed it- During the brainstorming process students are required to pick out the quotes they would like to use in their essay. I usually had them make a web surrounding the quote with their explanation. If their explanation and quote didn't belong in the web together, then it wasn't the right piece of evidence for their essay. The web made it very apparent to them.

2. They didn't cite correctly 
This is a big one because if they don't cite correctly, they are just stealing the author's words.

How I fixed it- I created a detailed lesson showing them how to use a quote in their essay and then we practiced over and over and over again on white boards (white boards are magic aren't they?!?). Each morning when they came in the room, I had a question ready for them to answer based on the novel they were reading. They provided an answer to the question using a direct quote. We  did it together at first, then as individuals where we shared good and poor answers as a class, and then we moved to checking them with partners. Finally I had a few "expert" quote masters who walked around the room helping the rest of the students.

We spent TWO WEEKS on this. Yes, that is a lot of time. But they sure were masters after that. When it came to end of the year testing/assessments, they were pros! 


Tuesday, December 15, 2015

Writers Notebook: The Introduction

The introduction to an essay is without a doubt important for any students essay. Introductions set the entire tone of an essay. I always tell my students think about the books you read. If it has a boring beginning, are you likely to continue reading it? NO! The same goes for your essays...

Here are some notes from our writers notebooks about what an introduction is.


The Introduction-

  • The very first part of your essay
  • Introduces the main idea/ topic of your essay
  • Grabs the readers attention 
  • Sets the tone of the essay 
  • Provides necessary background information 
  • Maps out your essay 
  • ***Contains the thesis statement*** 
  • I say it could be 3-5 sentences but let's be honest, I expect 5 good ones. 
  • A sentence or two of fact, piece of information, story, anecdote, or whatever to grab the readers attention. 
    • I  am not a fan of when my students just start their essays with a question so I don't even teach them that anymore. It seems to be their "go to" once they get the ok from me to do it so i try and teach other techniques.


Winter Writing

Happy Holidays! Need a little something to keep your sanity...errrrr.... students engaged in their work just before winter break?

Haha yea, me too. I found that a lot of resources for the holidays out there are aimed towards the primary grades but are kids really ever "too old" for holiday themed stuff? NAH! So I created this lovely little packet with lots of winter themed writing activities.

A personal favorite of all the kids is this Facebook page for Rudolph. You won't believe what they come up with!

Check out his FREE sample of winter writing :) Print & enjoy using it this week!


Friday, October 30, 2015

DIY Nursery Decor

How to Make Yarn Wrapped, Ombre Letters


I was put on bed rest at 31 weeks so I set out for a DIY nursery project. I loved the idea of making something that spelled out our little guys name. I didn't know what I wanted, but I knew a few things. One, I love ombre. Two, I was using navy blue in the nursery.  Three, I didn't want to spend a whole lot on the project. Enter these adorable yarn letters!

To make these letters, I found 3 different shades of blue in yarn. Honestly, you don't need anything fancy when it comes to yarn. I just found the brands that were on sale and went from there. Although, a little tip.... If you get really thin yarn, it will make more work for you. If you can, choose something thicker.

Next, I found the letters I wanted to use. I happen to find 3-D letters made of cardboard, but flat ones would have worked as well ((and they would have been MUCH easier to wrap)).  
Because I had chosen the 3-D letters, I had to wrap the sides of them as well which was the hard part. ((Thats why I would highly recommend flat cardboard letters instead.)) 

To wrap the sides, I found it easiest to cut small strips of yarn and glue them on the sides. To cut the strips (so I wasn't cutting 3 inches of yarn a million times) I wrapped the yarn around my fingers and then cut the strips in bulk. 
 Next, I hot glued the strips down. 
 I also found it helpful to hot glue the strips on the edges.

This worked well because the sides of the letters had curves and slanted edges. With all those abnormal edges, the yarn would slide and not cover the sides. 

After I wrapped the edges/ends of the letters, I had to start wrapping the rest of the letter. Getting started was the hardest part.  Obviously one side will be the back and you will never see it so start by hot gluing the yarn down with a big ol' glop of glue. Then, carefully begin to wrap! Add little dabs of glue so the yarn doesn't slip as you go. 

Hot glue was really nice and easy for this project because I could add a little here and there under the yarn and it dried clear and quickly. 


Finally, when it came time to switch colors for the ombre, I decided to weave the colors together creating a cool transition effect! 

And there you have a cost effective DIY Nursery Project! Enjoy! 

Wednesday, October 28, 2015

Persuasive Writing


When trying to write to persuade someone or to build an argument, it is really hard to write down your reasoning in a way that makes sense. I mean, that can be hard to do as an adult, let alone in middle school!

When I sit down and talk to my students, it is so easy for them to tell me what they are thinking (HAHA) because let's face it, they all have opinions! But this doesn't always come off in their writing.

So, I got to thinking. They have so much good stuff to say, maybe what is getting them is how to organize their thoughts into writing....

Generally at the middle school level we expect the students to have 3 reasons to support their opinion and we want evidence to back up that opinion.

Common Core Standards even state even in third grade, students should be able to write with reasoning to support their opinion/argument/persuasive piece. Not only that, but they should be able to develop those reasons with FACTS, DEFINITIONS, and DETAILS.

After third grade, they should be able to develop their reasoning with facts, definitions, details, QUOTATIONS, or other examples related to the text.

After looking and looking I couldn't find anything that I thought would really help the kids organize what they had to say and ensure they had reasoning to back up their arguments so I created this guy


This is PERFECT for the brainstorm process of writing a persuasive/argumentative piece of writing because......

1. It gives students a place to write down their argument, which helps them stay focused during their planing. 
2. It gives students 3 places to provide reasoning for their argument or persuasion. Each of those sections should become their own paragraph if they are writing at least 5 paragraph essays. 
3. It gives students lines to provide reasoning for their argument. This is where they should use textual evidence. This could be paraphrasing or it could be direct quotes. Such an advanced, yet required, skill in middle school! 

If you would like to download this organizer, click HERE!


Wednesday, October 21, 2015

Homework Pass

Here are some FREE printable homework passes. I used them as rewards for a variety of reasons. The kids LOVE them.
Enjoy!


Tuesday, October 20, 2015

How to Write A Thesis Statement in 4 Easy Steps

The thesis statement is super important! Because it is so important,  it can be overwhelming when you are first trying to write one.

The thesis is usually one sentence that explains the main idea of your entire essay. Once you have thesis statement, your entire essay revolves around it. You will spend the next several paragraphs explaining and giving examples that all relate to your thesis.


You can write a thesis statement in 4 easy steps.

1. The Question - The question is posed by the writing prompt. It is up to you to decide what the prompt is asking you to write about. This is the topic of your essay.
2. The Declaration- You must make a formal statement about the topic and then write about it.
3. The Reasoning- Your reasons will be facts, statements, or further explanation about why your declaration is correct.
4. The Thesis- Put all the information together from steps 1-3 into a single sentence and you have a thesis!

Use a graphic organizer like the one below to help you form a thesis.


If you would like some additional hep writing a thesis, click HERE

Monday, October 12, 2015

Free Thanksgiving Clip Art


Free Thanksgiving Clip Art made by yours truly. Enjoy! 

Thanksgiving Writing


I was always looking for holiday activities for my 5th graders. The problem with holiday themed activities I found is that they were targeted for much younger students. That was always disappointing because my 5th graders loved holiday stuff too!

So I set out to make some of my own that was more age appropriate. Some of the activities turned out to be so much fun that I couldn't help but share them with you all!

If you would like a FREE Thanksgiving Writing activity, just click HERE!


Wednesday, May 27, 2015

How to Write a Topic Sentence

When writing a topic sentence, I say that every topic sentence needs a TOPIC and A MAIN POINT. Here's what I mean, students are writing about something but they also need to make a clear and focused point about that something. Here is what I mean....

 how to write a topic sentence

Your topic is watching TV and the point you are making in this paragraph is that violence negatively influences behavior. 

When students are just beginning to write a topic sentence, it might be ok for them to write "watching too much TV is harmful." But, as they become better writers, if students just wrote "watching too much TV is harmful," it really doesn't provide the reader with enough information about the paragraph. What about watching too much TV is harmful? What else is the writer going to write about harmful TV watching?  

Teaching students the TOPIC + MAIN POINT technique helps students make sure their topic sentence is specific and focused, which allows them to further expand on the topic in an effective way. 

Some activity suggestions: 
Two activities I have liked to do to help them understand topic sentences are using sentence stripes and writing topic sentences for already written paragraphs. You could easily write a paragraph with a good quality topic sentence, mix up the sentences, and have the students put them paragraph back in order identifying the topic sentence and other parts of the paragraph if you want. The other activity I like to do is to pre-write some paragraphs that are missing a topic sentence. The students should then write a topic sentence that goes with that paragraph. Then, have the students share their topic sentences and they will see that while not everyone's is the exact same, they are fairly similar. 

If you would like to download the activities suggested above please CLICK HERE. I also have a whole group PowerPoint lesson available to you. 

Friday, May 1, 2015

Classroom Management Tips and Tricks: Using the Restroom

Classroom Management Tips and Tricks: Using the Restroom

Managing who uses the restroom and when is such a small part of the day, but it can be frustrating. Of course someone ALWAYS needs to go right when you start an important lesson or when you begin seat work, a writing task, or worse, in the middle of you giving directions. This tip works for literally any classroom no matter what age K-8.

How it works:

Have a designated object, one for boys and one for girls, that indicates they are in the restroom. When a student needs to use the bathroom, they just get up grab the object, and set it on their desk and go to the bathroom. When they come back, they return it to its designated spot. Simple!

Having been a substitute teacher, I have seen many different things used as the "restroom indicator" from beanie babies and passes that say BOYS or GIRLS. However, my favorite was simply small cones such as pictured below. Why? They are very easy to spot on a students desk when you are scanning the room and don't break easily.


Why it works:

I love this because the students have to make a decision about if it is or is not a good time to leave the room. It helps them become slightly more independent and take ownership over their learning. If they choose to leave the room in the middle of an important lesson or it results in them not finishing their work, they have to make up for it.
In addition....
1. Only 1 boy and 1 girl can be out of the room at the time. If there is no cone/bathroom indicator available, they just have to wait without even asking you :)
2. They don't have to interrupt your lesson or other students work time to ask you to use the bathroom
3. If they get up to go to the bathroom and it's not a good time, you can just let them know without a discussion about it. A simple "not now" or "in five minutes" does the trick.
4. If you are super busy and you can't remember who left to use the bathroom 5 minutes ago, just glance around the room and find their desk. Let's face it, those students and those days happen.

For the student that takes advantage:

I know what you might be thinking, what about the student who decides this is a free pass to leave your classroom 10 times a day. Not to worry. I have a solution for that. Popsicle sticks! Assign 2-3 popsicle sticks to that particular student or to the whole class. When they want to use the restroom, they have to turn in the stick. If by the end of the day they run out of sticks, oh well (unless it's a huge emergency)!!

Visit my TeachersPayTeachers store by clocking here!

Wednesday, March 4, 2015

Substitute Teacher Report

I love leaving this form when I am visiting classrooms! Sometimes teachers want something specific filled out so I leave notes that way. Sometimes there is nothing at all so I bring my own copy of this form.  It takes 2 minutes to fill out at the end of a day. 

I can't take all the credit for designing this because I saw similar ideas on Pinterest, but I made it my own! 


Becky's Room on TPT

Friday, February 27, 2015

Writing an Introduction Strategies

Introductions are so important because it's the first impression the reader gets about your essay, it provides a road map for the rest of your essay, it makes readers want to keep reading your essay, and it provides the writers opinion.

An introduction needs to have 3 things.

1. Something to get the readers attention or get them interested
2. Necessary background information
3. The thesis statement


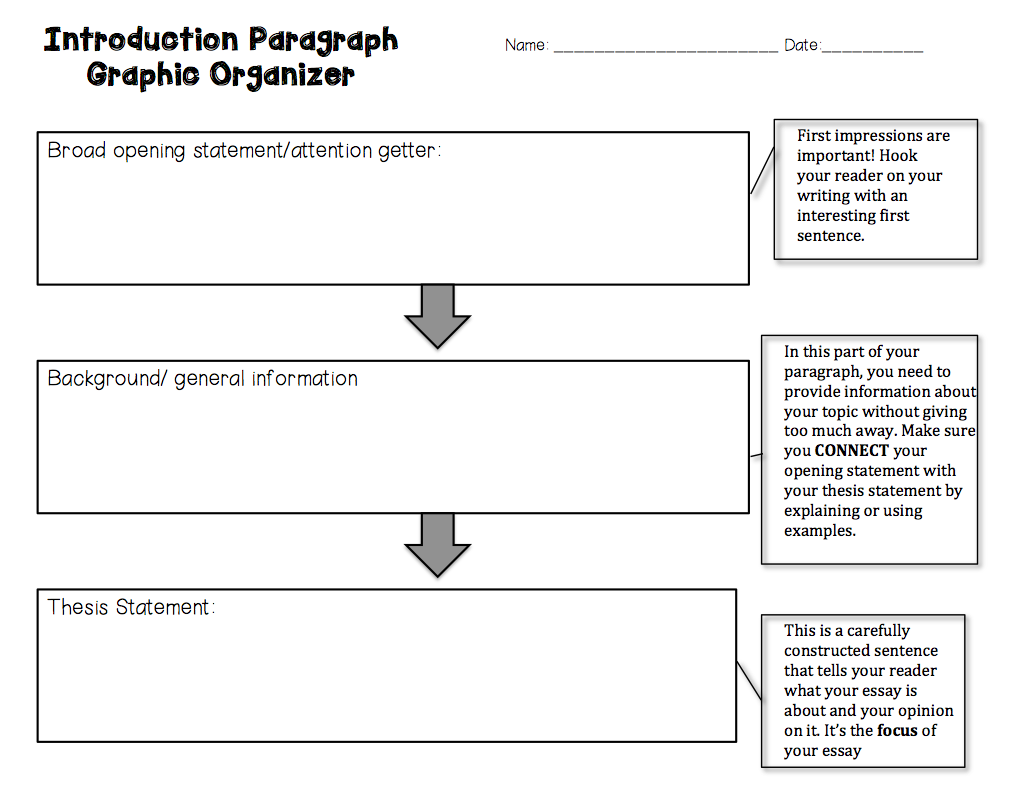
This graphic organizer is something I created to help beginning writers write an introduction. 


Some strategies for writing the introduction are as follows:

1. Begin with a shocking statement. - Use some facts from a text that goes along with your essay or make a bold statement about the topic of your essay. This grabs the readers attention and makes them want to keep reading.

2. Ask a question- Ask a question and have your whole essay be a response to the question you posed. Be careful though. This is an "easy" way for students to start their essays and very often they get stuck using the questioning technique.

3. Begin with a personal anecdote - Make a connection to your essay! Refer to something that happened to you. This can be a VERY powerful way to start an essay because it makes the reader want to see how your experience unfolds throughout your essay.

4. Give historical background to set the scene- Depending on the topic of your essay, you might want to provide some background information to set the reader up to successfully understand your writing.

5. Use a quote from someone who is knowledgeable on the subject. Don't forget to give the author credit for their quote :)

6. Begin with a sensory description of the setting- Set the scene using descriptive words that pull the reader in.


If you would like to see a full PowerPoint Lesson with graphic organizers on how to write an introduction, thesis, and conclusion, click HERE.

Friday, February 20, 2015

Introductory Paragraph Graphic Organizer

Writing an introductory paragraph for young writers takes practice.

I have found that around 4th grade they get taught about "hooking" their reader in. An easy way for them to do that is to start with a question. So by 5th grade... all of them are starting their papers with questions! Now, there isn't anything extremely wrong about this in middle school, but it can get boring for the reader (aka ME). Sometimes I would like to shout, "There are other options out there people!" This means a huge part of my time is teaching the students other ways to start their essays.

To start teaching them how to write an introduction, I use this graphic organizer which I made. There are three sections

1. The broad opening statement/attention getter (*Note I didn't use the word HOOK since it is so strongly associated with asking a question for some reason)  
2. Background or general information 
3. The thesis 
 Introduction with thesis statement graphic organizer


To use this template, I start by modeling. I love modeling and I love my writing journal, so I model everything in a writing journal just like the ones the students have.

The writing prompt I use is usually one that I just made up that morning and it is usually from a novel we are reading. This way it is relevant to our reading curriculum too. So I model how to write an introduction from the prompt with a little help from the class. As I am doing this, the students are also copying what I am doing down on their own organizer which is cut and pasted into their journals for future reference. It becomes their own personal writing textbook.

The next day, I will have another writing prompt that is once again usually something I made up that morning and is usually from the novel we are reading. But this time, they will be the ones telling me what to write in the graphic organizer. Everyone has out yesterdays introduction to look at and I take lots of students comments and ideas and as a class we decide on what goes into that paragraph.

Depending on how quickly and how well they are catching on, on the third day I will have them do it on their own with a partner or go straight to trying it on their own. Days 4 and 5 are on their own practice. By the 5th, we also might be switching our introductions with a peer for editing.

One final thing I should mention is that I didn't give a specific number of sentences that the students should use. I will leave that up to you! As a general rule, we go with the five sentences minimum per paragraph. But with an introduction, some turn out very repetitive because they are trying to squeeze in an extra sentence whereas others need to make theirs longer.

If you would like a copy of my graphic organizer click HERE. This link also contains a graphic organizer for how to write a thesis statement.

Enjoy!

Friday, February 13, 2015

Understanding the number 5- Number Sense


FREEBIE FRIDAY ALERT!! 

Here's a fun little whole group lesson you can do with pre-school age- kindergarten. This is also great for those looking to work on numbers at home. 

Before trying the lesson, make sure they can count to 5. After they can count to five, you want them to understand what FIVE really means. 

During this lesson, you will have the kids fill in the bubbles ONE section at a time, all adding up to five, using two different colored markers, crayons, or highlighters. For example, “Show me 1 + 4”. One circle is green and 4 are red. How many do you have?  Then they practice writing the numbers in the equation. You should also phrase your question differently. For example, say, “If I have 1 circle red, how many more circle will I need to fill in to get 5?”


So what does this do? MATH FACTS and NUMBER SENSE!!!! 

It helps students start learning their math facts! That is such an important foundation for all math. 

Number sense- or the intuitive understanding of numbers and their relationships. Number sense is the ability to have a sense of what numbers mean. That means the the number 5 means five objects. This little activity helps to create a visual pattern for the visual learners. It also helps kids compare sets of numbers in a manageable way. 

And for those of you tackling Common Core State Standards.... this is a great little activity for "conceptual understanding of numbers."

Click HERE to download a free PDF file of my understanding the number 5 lesson

Here's a link to a number sense game for kids

Friday, February 6, 2015

Friday Freebie!

I LOVE graphic organizers.

Here is a story map graphic organizer I made. You could also use it if you are working on parts of a story or literary elements

Click here to download the organizer like the one below for free!


Thursday, February 5, 2015

Compare and Contrast Essays

Teaching students how to write compare and contrast essay can be tricky! It's not that they don't understand how to compare and contrast, but organizing the essay in a way that makes sense and is meaningful can be confusing!

Here is what I found. My students needed CLEAR structure. I gave them two options. Point-by-point organization where you write each paragraph about how they are alike or different. Or, they can use block organization where you write one paragraph all about subject A and the second paragraph all about subject B.

Although this can look confusing in a blank template, I designed a complete lesson for teaching compare and contrast essays that has a PowerPoint, blank templates, sample brainstorming, and sample essays to go along with the PowerPoint. Check it out here!


Tuesday, February 3, 2015

Paragraph Structure

Teaching the proper structure of a paragraph was so much fun using the hamburger method.

The reason I LOVED using this is because it really stuck with some of my struggling writers. I taught fifth grade, but about 40% of my class read below the fifth grade level. However, I didn't want them to write below the fifth grade level. And don't think the rest of the class didn't love this, because they did! Some students picked up right away how to write a well structured paragraph so they didn't need it for long. The rest, well they still asked to use it for a few weeks.

You can get my complete hamburger paragraph PowerPoint with lessons by clicking HERE for free! I used this powerpoint over the course of a week. We started the week by discussing what a paragraph is and WHY we write with the paragraph structure. Next, I showed some "good" and "bad" examples of paragraphs. Everyone could clearly see why it was important to write in paragraph form.


Next, we reviewed the parts of a paragraph where they took notes in their writers notebooks.


Note* I personally used composition books so the students could take their own notes about writing. This becomes a fantastic resources for them to use throughout the year.

From there, we practiced everyday for 1-2 weeks. I kept many, many copies of the blank hamburger in the room and students could take them as needed. We started by writing a paragraph together, then they tried with a partner,  and finally on their own. After each time we practiced, we shared as a class our writing and analyzed it using a rubric. Let me just say,  I. Love. Rubrics. when it comes to writing. It helped my students so much when I taught them how to use the rubric themselves.


Click the link to get my FREE PowerPoint off TeacherPayTeachers! Please leave some feedback if you download the link! Thanks :)